Adobe Premiere Speed Keyframe : How to Add & Set Keyframes in Adobe Premiere Pro
Di: Luke
Do one of the following: In the Effect Controls panel, right-click a keyframe marker. If you do not select this option, Premiere Pro may create several incremental keyframes of identical values between those two points, depending on the speed at . Apply the preset so that the length of the animation is spanning the clip. In a Timeline panel, select the clip that contains the effect you want to animate. Apply the speed ramps. I use 4K clips in a 1080 sequence.Hi, In case i would like to shorten a clip in Adobe Premiere Pro (with speed/duration function ) and this clip contains effects like a keyframe for opacity – 9513082 Adobe Community All community This category This board Knowledge base Users cancelOptimieren der Keyframe-Automatisierung.
To nest a clip, right click on the clip, then select nest. Same procedure on Windows except hold down shift/control/alt. On Mac hold down command/option/shift and then let your system make changes. Just after posting this issue and going back to program it just worked ?. Hey, I’m the latest version of Premiere pro and can’t seem to move the speed line on the clip up or down or use the pen tool. Premiere Pro is up-to-date.
How to move a speed ramp keyframe?
Peru Bob • Community Expert , Apr 13, 2021. If you want to add and adjust keyframes in a Timeline panel, make keyframes visible for the video or audio track. Then place the new 4K sequence into your 1080 sequence and manually stabilize. Reverse the clip and it will reverse the keyframes. Nest the clip to a new 4K sequence. Nest it, but change the sequence size if you need spillover.

If you twirl-down the arrow to the left of the property you’re animating (position, anchor, etc.In my case I had animated keyframes and saved them as a preset. Zuletzt aktualisiert am 24. Click the Show Keyframes button in the track header of a video or audio track, and choose one of the keyframe options from the Show Keyframes menu.1 Correct answer. Erfahren Sie, wie die Funktion für die automatische Keyframe-Optimierung .View keyframes for an effect property in the Timeline panel. Be sure you’re working on an active track, in this case V2, which contains .
How to Create & Use Speed Ramping in Premiere Pro (Tutorial)
Create a keyframe — Press P or select Pen on the toolbar. Solved: How do you move an existing speed ramp keyframe added by hitting CTRL+LmB ? Drives me crazy. If you try to add a keyframe to a clip that has a speed ramp/time remapping, it does not work.

That’s an important first troubleshooting step.To create a speed ramp, you will need to add keyframes. Choose an interpolation method from . 2nd question is weird.If V2 isn’t shaded, click it once to make it the active track in Adobe Premiere Pro.
Solved: Is it possible to gradually speed up a clip using keyframes? For example, i have a clip of 1 minute that i want to start with 100% of speed and make – 11860556Step 1: Right-click on the desired clip, and select Show Clip Keyframes, Time Remapping, and Speed successively. Put the clips in a 4K sequence. This means you .

Choose Edit > Copy. Hi everyone, I am a daily vlogger and almost every Vlog starts with some cinematics with speed ramps.Hitting ALT+LMB – finally! Hitting ALT+LMB – finally! In Premiere, it’s called ALT+click or drag.Add Smooth Ease Keyframes and Control Animation Speed .
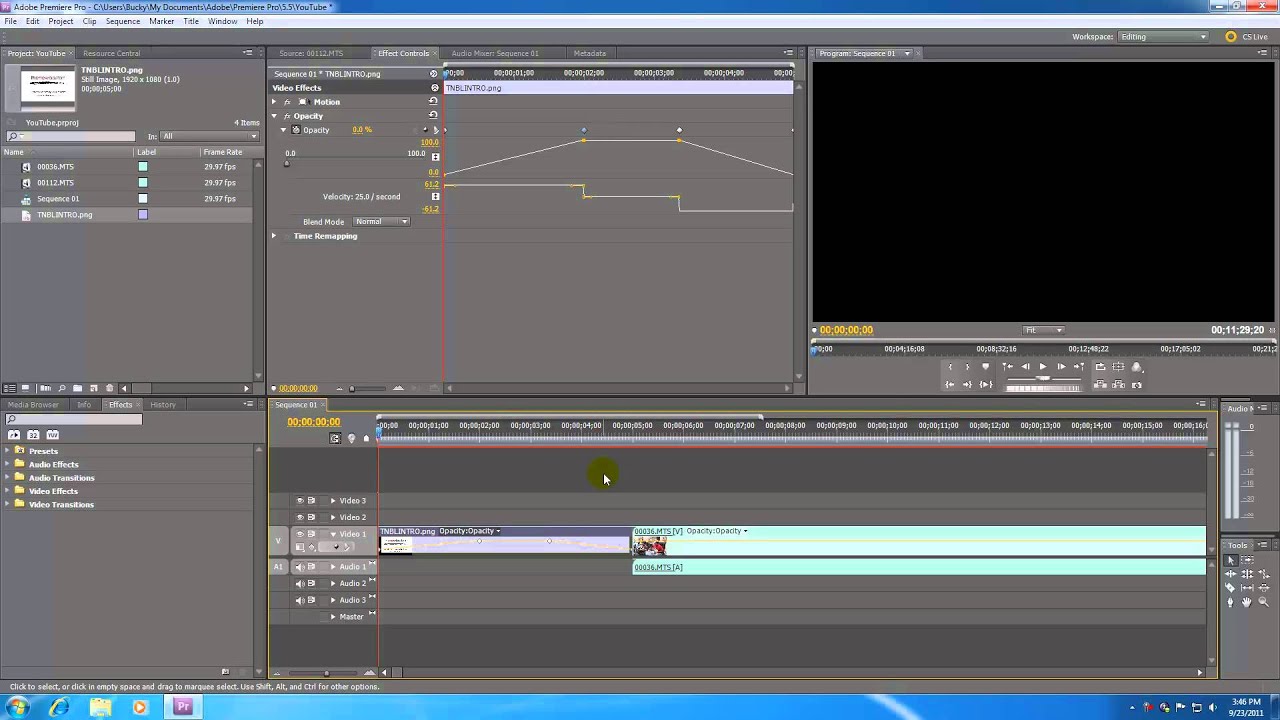
Note: Keyframes will display and can be .Solved: Is there a way to speed up how fast I can scroll the keyframes? The movement speed is really slow for me. Every time I want to do some speed ramps I have to right-click the clip > Show Clip Keyframes > Time Remapping > .I can’t enable the effect to adjust the speed of th entire clip or add keyframes to do speed ramping.Speed keyframes can be applied in the Effect Controls panel, or on a clip in the Timeline panel.
Solved: Speed keyframes
Optimieren der Keyframe-Automatisierung in Premiere Pro
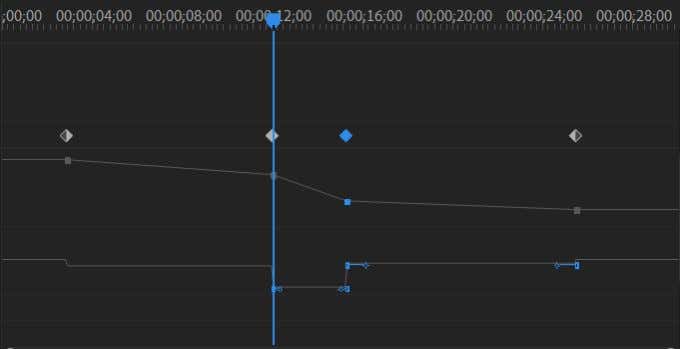
A speed keyframe can be split to create a transition between two different playback speeds. Add/Remove keyframe button. Solved: How do you move an existing speed ramp keyframe added by hitting CTRL+LmB ? .Last updated on May 23, 2023.comEmpfohlen auf der Grundlage der beliebten • Feedback
Optimize keyframe automation in Premiere Pro
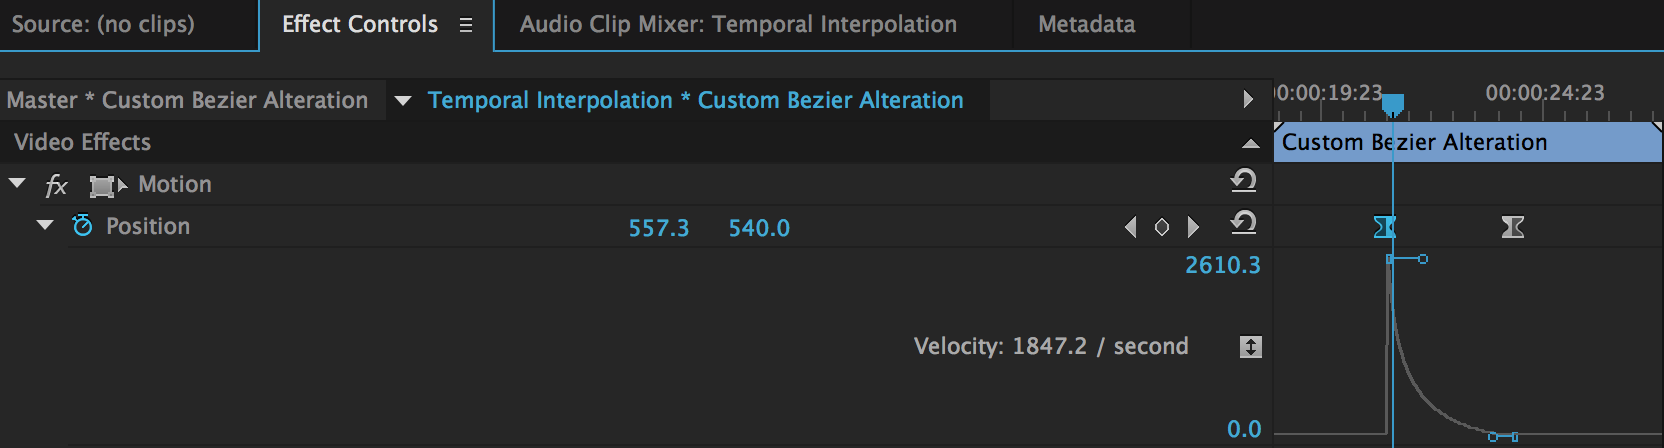
I click on it it splits in two.Enthusiast , Apr 18, 2017. Nesting the clip it’s not a solution since we would get black areas when .Any help is appreciated! Thanks! Apply either the scale/position changes and nest the clip, or the time ramp changes and nest the clip.) you’ll see a velocity graph which describes how the speed of a movement between two key frames is distributed. I’m using Mac . How do you move it – . Click on a keyframe with that graph open and you’ll get bezier handles you can use to change that distribution.
How to Add & Set Keyframes in Adobe Premiere Pro
In the Effect Controls panel, click the triangle to expand the effect to reveal its controls and keyframes. I never edit the opacity of a clip in the timeline. Show video keyframes is enabled. Step 2: Now, the clip is shaded blue with a horizontal rubber band. Position the playhead to where you .
Solved: How to reverse keyframes
Show Clip Keyframes TIme Remapping as default instead of Opacity. You may want to reset preferences. Erfahren Sie, wie die Funktion für die automatische Keyframe-Optimierung in . To do this: Close Premiere. The animation is doing what I . Führen Sie einen der folgenden Schritte aus: Klicken Sie im Spur-Header einer Video- oder Audiospur auf die Schaltfläche „Keyframes anzeigen“ , und wählen Sie im Menü „Keyframes anzeigen“ eine Keyframe-Option aus. Learn how the Automation Keyframe Optimization feature in Premiere Pro avoids creating unnecessary keyframes in audio tracks. When the speed keyframe . I thought I had tried that and was getting the same results but I’ll try it again and see what happens. I’ve included an image of what I am trying – 12455978 The movement speed is really slow for me. Then, click on the white line in your video track once where you want to start your speed ramp and again where you . When first applied to a track item, any change in playback speed on either side of a speed keyframe is instantaneous at that frame. Is it possible to gradually speed up a clip using keyframes? For example, i have a clip of 1 minute that i want to start with 100% of speed and make it end with 115% . To do so Cmd+Click or Ctrl+Click the rubber band.Optimieren der Keyframe-Automatisierung in Premiere Pro.What Are Keyframes in Adobe Premiere? Keyframes are a feature that allows you to change the properties of an effect or a transition over time. Zuletzt aktualisiert am 27. Add a clip that is one second in length to a sequence. This is just a dummy clip. Hello, I am doing an animation where I pull out from a fixed point in a still image, by adding keyframes to both position and scale.This allows you to view the speed keyframes of a clip. (You may have to subclip).Anzeigen von Keyframes für eine Effekteigenschaft im Schnittfenster. Any advise appreciated! – 14113321. Right-click (Windows) or Control-click (Mac OS) the clip containing the keyframe properties you want to view. I tried clearing the cache along with restarting the application. I went into an old project with time remapping keyframes and I can’t change those either.comKey framed parameters speed up – Adobe Community – .1st question you might want to switch it to linear and then change it to continuous before. Toggle animation button B.With this option selected, Premiere Pro only creates keyframes at the points that represent an increase in value from the beginning (0 dB) and ending (–12 dB) keyframes. Select one or more keyframes. In a Timeline panel, right-click a keyframe.

Hitting ALT+LMB – finally! In Premiere, it’s called ALT+click or drag.

Drag the rubber band upward to . You’ll know if you’ve got it right because the horizontal white band will go from the upper portion to the middle.
- Adresshandel Datenschutzgesetz
- Advantan Milch Anwendungsdauer
- Adware Browser Hijacker , How to Remove Surf Browser Hijacker
- Adobe Dataview Ansicht – PDF-Ansichten anpassen
- Adjektive Mit Bildern _ Die 200 wichtigsten deutschen Adjektive für A1 bis C1
- Adidas Running Shorts – Alle Materialien
- Aesthetic Sensitivität Definition
- Adressänderung Finanzamt Elster
- Adolph Coors Brewery : Coors 150
- Adina Vetter Filme , Erzgebirgskrimi: Folgen mit Adina Vetter
- Adler Und Falkenhof Burg Maus | 15 Unterschied zwischen Falken und Adler (mit Bildern)